 matte0
⚠ ️ SCENARIO: Adding/Removing a Standard Route (HO & Onsite)
Standard Route is a route that will always be included in the routing clearance.
✓ ADDING STANDARD ROUTE
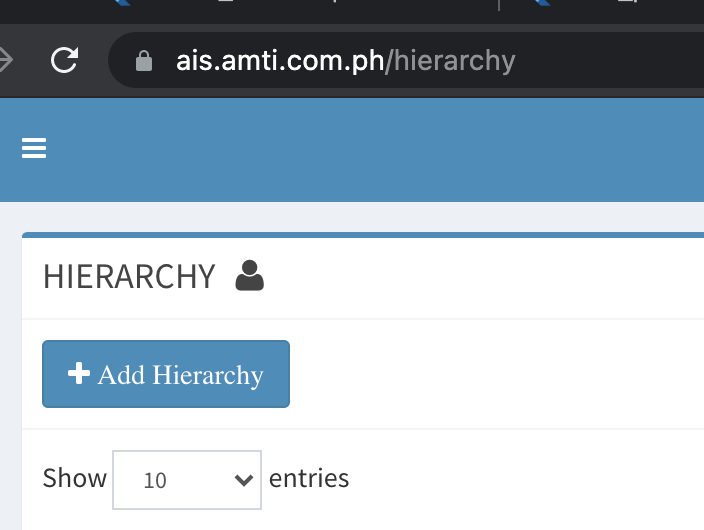
- Go to AIS and access the System Admin > Hierarchy.
- Click the + Add Hierarchy on the upper left side of the page to add Department/Route.
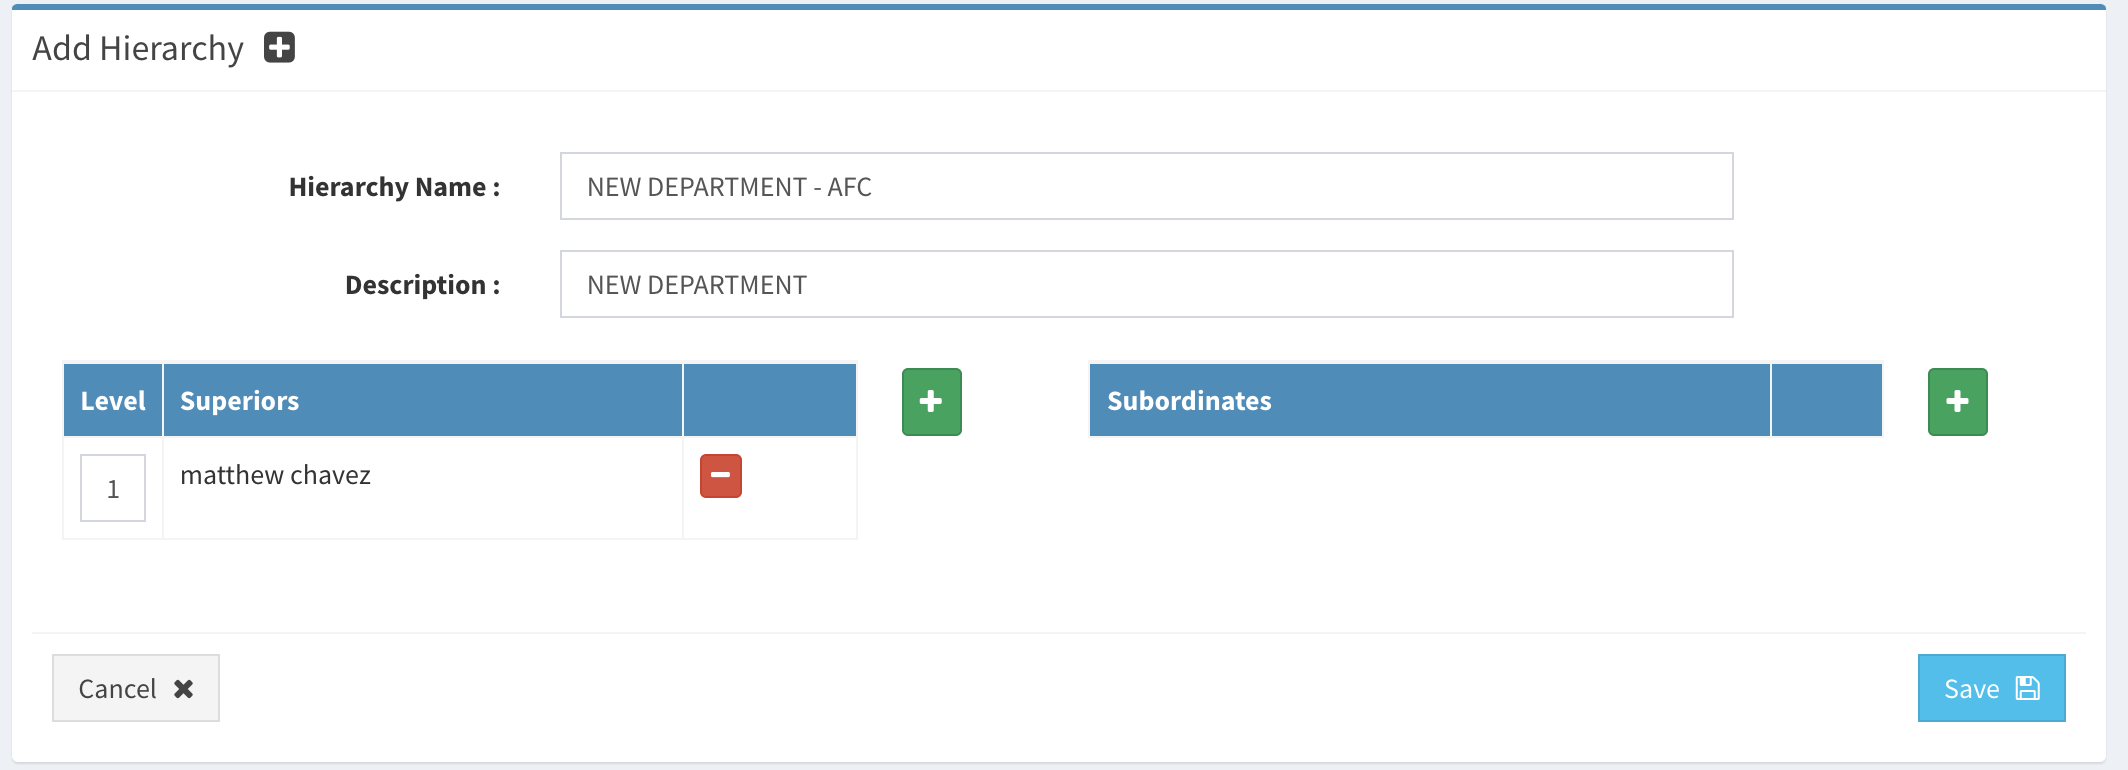
- On the Hierarchy Name: Insert using the EXACT FORMAT AND RULES:
- [✓] Prefix is the Department/Route name
- [✓] Prefix is recommended to be capitalized to be standard with the previous departments/route.
- [✓] Suffix is the Form Type
- [✓] Suffix for the Head Office should be AFC.
- [✓] Suffix for the Onsite should be ONSITE.
- [✓] Suffix should be capitalized.
- [✓] Prefix and suffix must be separated by a dash (-) symbol.
EXAMPLE:
✅ MIS - AFC       // For Head Office. Follow required format
✅ Admin - ONSITE  // For Onsite. Follow required format
❌ MIS-onsite      // No spacing to separator, small caps.
❌ Admin-Ho        // Doesn't accept HO as identifier, use AFC for HO
Dev note:
<Department/Route> - <FormType>is formatted this way to separate the different form types when assigning the routes to the clearance.
-
On the
descriptioninput. It is IMPORTANT to insert Department/Route Name as this will be shown as display text in the system and the printouts. -
Add Approver (Superior) using the [+].
- Use level 1 (one) ONLY
- Add 1 (one) Approver/Superior ONLY
-
Add Sub-Approver (Subordinates) using the [+].
-
Click Save once completed.
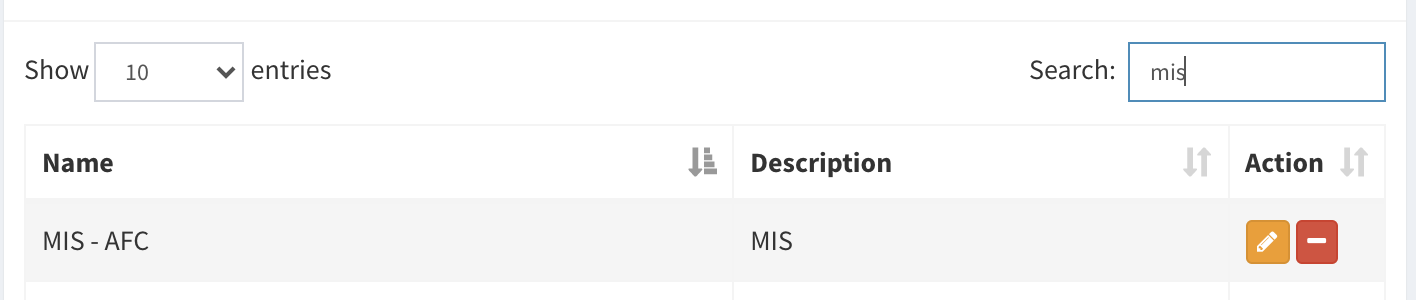
✓ REMOVING/ARCHIVE STANDARD ROUTE
- Go to AIS and access the System Admin > Hierarchy.
- Search the department/route to be removed in the standard routes
- Click the archive module represented with [-] button.
Reminder:
- This will only affect the newly filed clearance application forms.
- Currently routing clearances with the removed route will remain routing and Approvers of the said department/route should still process the remaining clearance applications.
✓ Add/Removing department concerned route (HO & Onsite)
Adding and removing a department concerned routes is a once a blue moon scenario (Adding a department to a clearance route also means adding a route).
Before adding department concerned to the clearance forms. Please refer to the checklist below before proceeding:
CHECKLIST BEFORE ADDING:
-
Head Office Department Concerned: Before adding department concerned for Head Office (HO). We must first consider the following to the requestor which is mostly the HR/SuperUser.
- [✓] Department Approver(s) must have an existing and active account in AIS
- [✓] Approver(s) must have an existing and active AMTI Email account connected to its User account
- [✓] Approver(s) must be advised that he/she will be a clearance approver.
-
Onsite Department Concerned Just like in adding department concerned for HO we must consider checking the department approver(s) account is already existent in AIS. Please refer on the Adding Department Concerned for HO to see the checklist. Apart from this Approver rules. Some specific considerations should be kept in mind when adding Department Concerned for Onsite.
- Most common projects/clients have Service Delivery Manager (SDM) and Service Delivery Lead (SDL) for Onsite Department Concerned. SDM is considered an APPROVER automatically, On the other hand SDL's are considered SUB-APPROVER.
- A single Approver still works however rare in Onsite Clearance.
✓ ADDING DEPARTMENT CONCERNED FOR HEAD OFFICE:
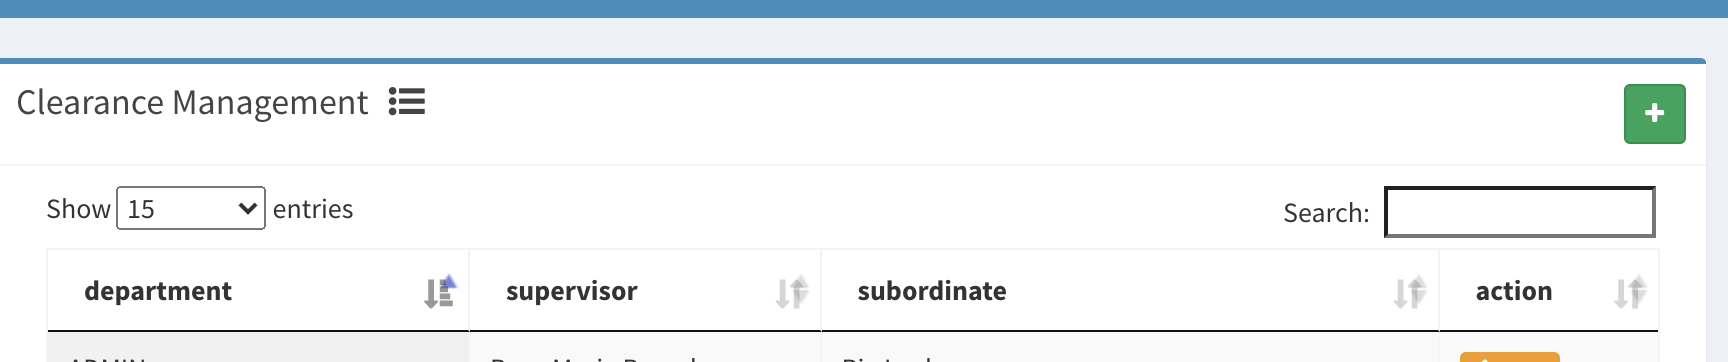
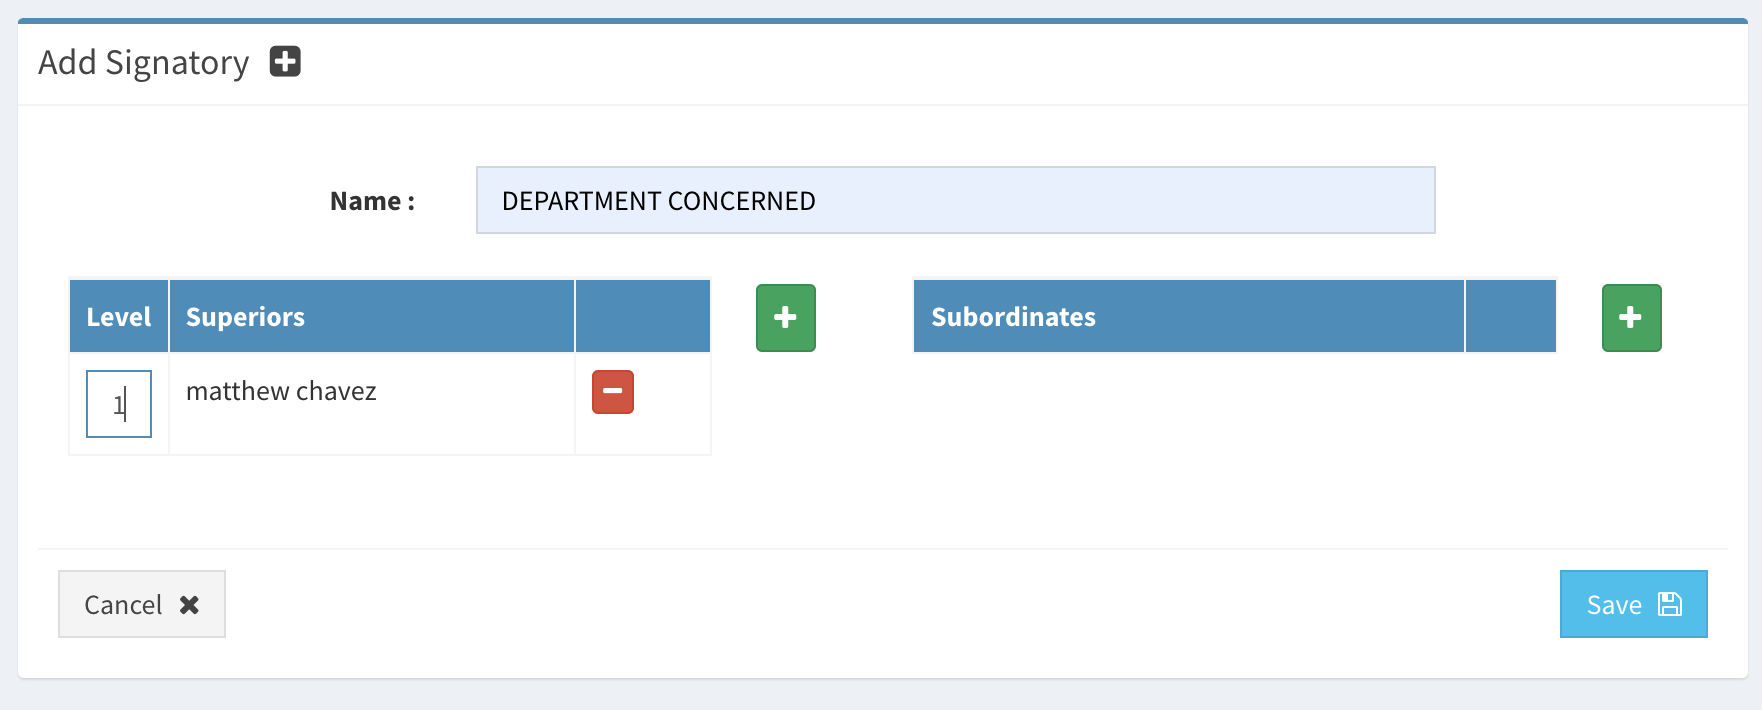
- Go to AIS and access the System Admin > Signatory Mgmt.
- Click the [+] on the upper right side of the page to add Department.
- Insert "Department Concerned" as Name in the input box.
It is important to use "Department Concerned" keyword. The system will automatically concatenate a series of uniq random key to the end of the word. "Department Concerned" will become "Department Concerned1a2b3175..."
- Add Approver (Superiors) by selecting the [+]. USE ONLY level 1.
- Add Sub-Approver (Subordinates) only if needed by selecting the [+].
- Click Save once completed
Note that Signatory Mgmt is an old module. This is considered a Clearance Tech Debt since its implementation. See the explanation why on the Tech Debt: Route Management. You can however use the Hierarchy Module to add Department Concerned for HO but I highly discourage it.
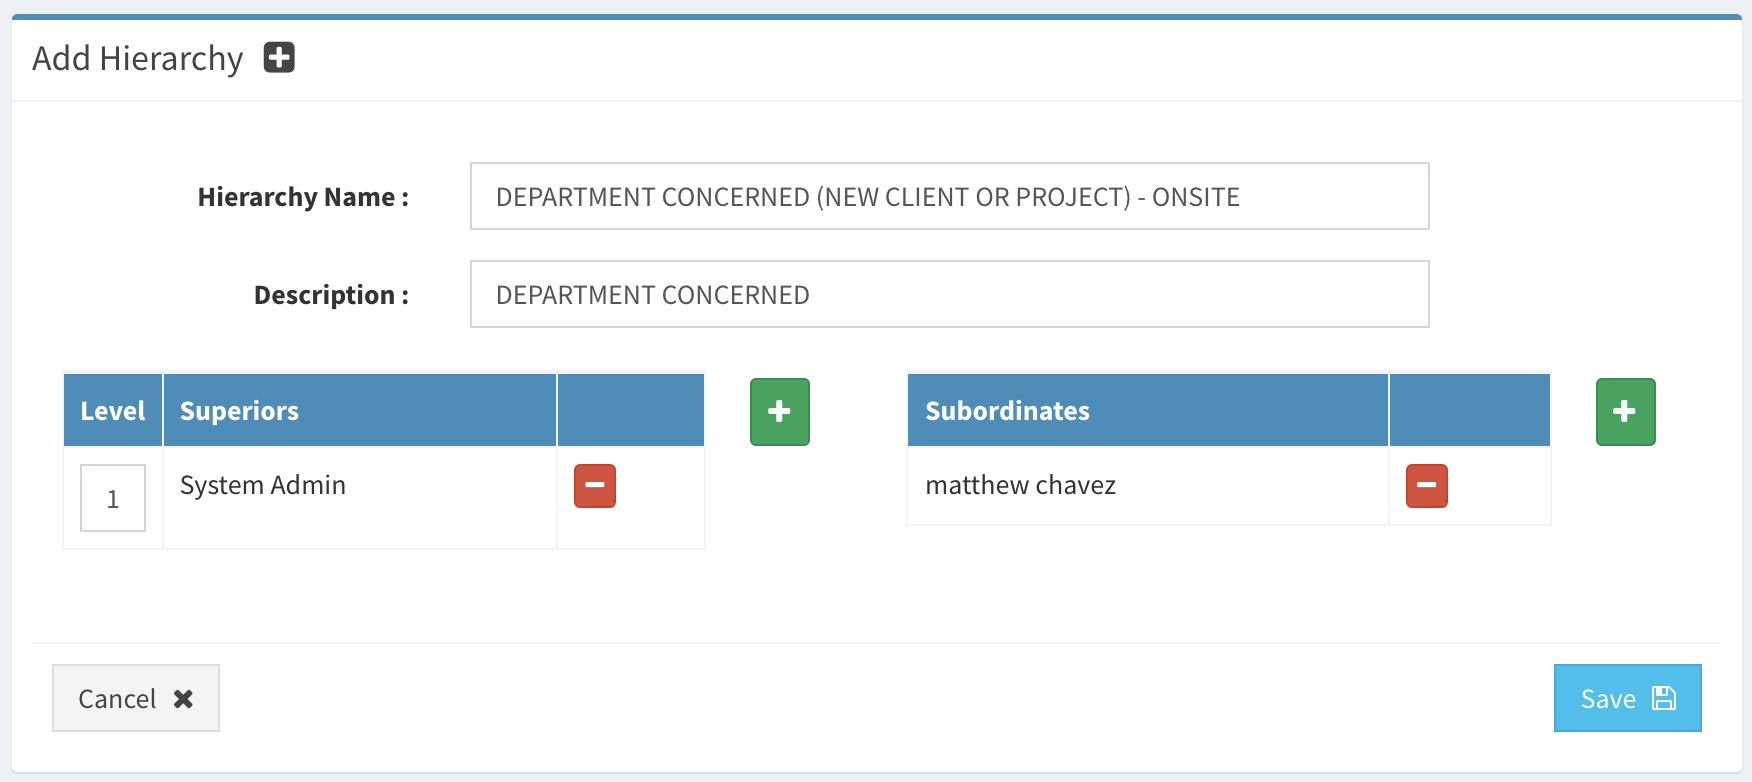
✓ ADDING DEPARTMENT CONCERNED FOR ONSITE:
- Go to AIS and access the System Admin > Hierarchy.
- Click the + Add Hierarchy on the upper left side of the page to add Department/Route.
- On the Hierarchy Name: Insert using the EXACT FORMAT AND RULES:
- [✓] Prefix is "DEPARTMENT CONCERNED"
- [✓] Project name is enclosed with ( ). Project name is recommended to be capitalized
- [✓] Suffix should exactly be: - ONSITE
The enclosed Project Name will be used in the Project Name section in the Clearance Application Form for Onsite
EXAMPLE:
✅ DEPARTMENT CONCERNED (PROJECT NAME) - ONSITE   // Should be exact format
❌ department conceRned(PROJECT NAME)-onsite // Will not be visible in the routes- On the description input. It is IMPORTANT to insert DEPARTMENT CONCERNED only as this will be shown as display text in the system and the printouts.
- Add Approver (Superior) using the [+]. Note: Use level 1 ONLY.
- Add Sub-Approver (Subordinates) using the [+].
- Click Save once completed.
This is considered a Clearance Tech Debt. Since it is cumbersome to follow this set of rules to insert a department concerned route.
⚠ ️ SCENARIO: Approver replacement (HO & Onsite)
Approver replacement is a common scenario. It's not a usual day to day support per se. But it is important to fix this data as soon as possible.
✓ REPLACING THE APPROVER
We must first consider knowing the Form Type before replacing the approvers.
Both form types (HO and Onsite) can be modified in the Hierarchy Module, However it is difficult to find a specific department concerned on the HO using the said module due to the old implementation of the Department Concerned for HO.
Use only the Hierarchy Module to replace approver if:
- [
✔ ️] Replacement approver is a Standard route for AFC/HO Form Type. - [
✔ ️] Replacement approver is a Standard route for ONSITE Form Type. - [
✔ ️] Replacement approver is a department concerned for ONSITE Form Type.
Use only the Signatory Management to replace approver if:
- [
✔ ️] Replacement approver is a department concerned for HO Form Type.
The clearance module is highly dependent to the AIS Hierarchy module
⚠ ️ SCENARIO: Approver replacement while Clearance is routing
This type of scenario usually happens when the approver is part of the standard route (Payroll, HR etc.) that accumulates clearance route regardless of form type.
Approver replacement should be dealt with early on. A clearance without the presence of the assigned approver will further delay the employee's clearance and as well accumulate invalid data for the HR/SuperUsers.
This usually happens when:
- Approver has resigned while a clearance routed to him/her is still pending.
- Approver needs temporary replacement due to emergency (Maternity, Paternity, long term leave, etc.).
✓ CHECK AFFECTED ROUTES
It is advisable to check the affected routes first before proceeding to change the currently filed clearance.
The following script is used to check the affected clearance_data rows in the clearance database. Three (3) required data should be retrieved when checking an approver that will be replaced.
-
clearance_form_hid: TheHierarchy IDof the said department. -
approver_id: TheApprover IDof the previous approver. -
route_status_id: Status0(PENDING) route should only be retrieved.
Not necessary but included just to be safe.
-
form_type: Clearance form type is eitherAFC(now considered HO) orONSITE.
SELECT cr.* FROM clearance.clearance c
INNER JOIN clearance.clearance_route cr
ON cr.clearance_id = c.id
WHERE c.form_type = <FormType>            # change to either `AFC` or `ONSITE`
AND cr.clearance_form_hid = <hid>         # change to actual `hid`
AND cr.approver_id = <ApproverId>         # change to actual `approver_id`
AND route_status_id = 0;
✓ APPLY UPDATES TO ROUTE
You can either use your SQL IDE to update the data or you can use the script below. Note that the script provided is the most common/simple sql script to edit all currently routing data to the latest approver.
-
new Approver_id: Add thenew Approver_idto the update SET. This ID is associated/related with theais.users.users_id. You can find the id using theais.userstable and look for theuser_id. -
old approver_id: Add theold Approver_idto the update WHERE. This ID is associated/related with theais.users.users_id. You can find the id using theais.userstable and look for theuser_id. -
date_updated: Set thedate_updatedtoNULLas it auto updates the timestamp on when the row is updated. -
route_status_id: Set theroute_status_idto0to update only the routes that is still onpending.
UPDATE clearance.clearance_route
SET approver_id = <new ApproverId>, date_updated = NULL
WHERE clearance_form_hid = <hid>
AND route_status_id = 0
AND approver_id = <old ApproverId>;
!! IMPORTANT REMINDER !! : The Script provided is case to case basis. It is advisable to test this in Dev/local environment first before executing in the production. Some scenarios could be more complex and the following script conditions would not suffice the expected result.